

Import a WordPress demo website
A demo import turns an empty WordPress install into a finished website in one pass. Pages and posts, the images, the menus, the forms, the header and footer, the settings behind them. This guide covers what happens, what it touches, and the two different ways to undo it.
Step 1: Activate your licence first
Start here, because every other step waits on it. Demo packages are served from our servers after your key is checked, so an unlicensed website sees the catalogue but cannot download anything from it.
Where to paste the key
Your key is in your dashboard. In WordPress it goes into the licence step of the setup wizard, or later into Canvas, then License. The screen reports the status, the plan the key belongs to and the domain the seat is now attached to, so you always know which of your sites are spending seats.
What a key does and does not do
- It opens demo imports, premium blocks in the editor, AI and updates.
- It does not decide whether your website is allowed to load. An expired licence keeps rendering everything you have built, and pauses the service around it.
- Staging, development and local copies of a site you have licensed are free and use no extra seat.
- If a routine check cannot reach our servers, Canvas carries on as normal for 14 days. A network blip should never lock you out of your own admin.
Step 2: Take a backup and check the requirements
An import creates a lot of rows in a short time. None of it is destructive, and you should still be able to get back to this morning in one move.
- Take a backup through your host or a backup plugin, and open the backup list to confirm the last one finished. Scheduled backups fail quietly.
- Check the versions. WordPress 6.8 or newer, PHP 7.4 or newer, tested up to WordPress 7.1.
- Give PHP room. Media is the heavy part of an import, because your site downloads and resizes real photographs. A low memory limit or a short execution timeout on cheap shared hosting is the usual cause of a stalled run.
- Decide the scope now, before the dialog asks. Step four explains the choice, and it is easier to make with a clear head than mid import.
Importing on a site that has content is supported and safe. Whether a second design belongs on top of your first one is a design question, and only you can answer it. If you want a few pages and nothing else, choose the page-only scope in step four.
Step 3: Where the importer lives
There are two doors into the same catalogue.
The setup wizard
Activate Canvas and the wizard opens with the demo step built in. It is the fastest route on a new website, because the wizard also installs any plugin your chosen demo needs and names the site at the end.
Canvas, then Demo Import
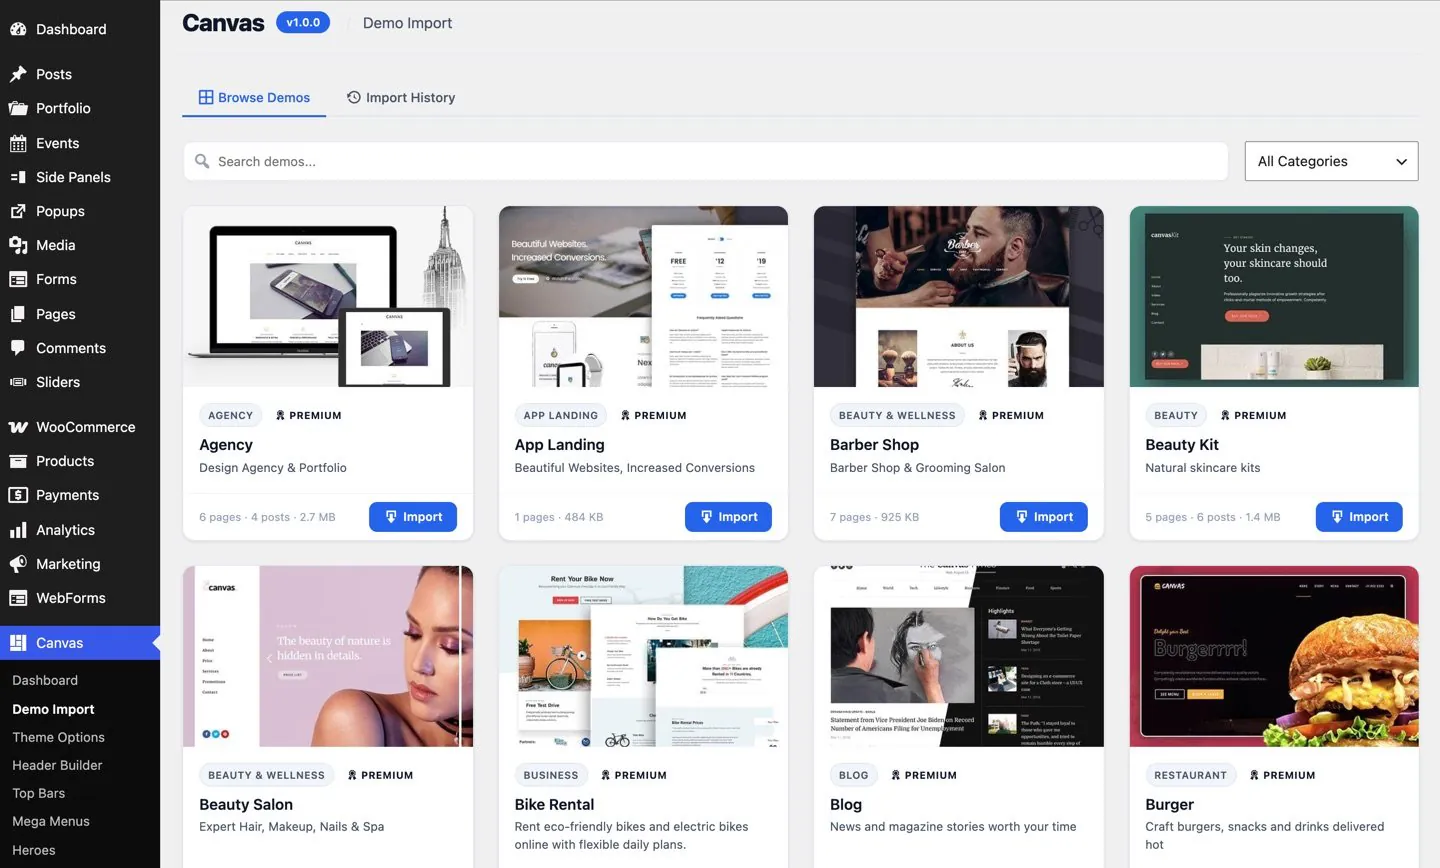
The same catalogue lives in the admin menu permanently. Use it to import a demo weeks after setup, to bring in a second one, or to read the history of what you have imported. Every card names its category and counts what the demo brings: pages, posts, portfolio items, products or its own content type. Nothing about the size of it is a surprise.
There are 80 demos across 16 categories, and every one of them is included with every plan. Preview a demo on the web before you import it, because a live preview tells you more in thirty seconds than a screenshot does in a minute.
Step 4: Site-wide or into an existing website
Read this step before you start. It is the one decision in the whole process that reaches your existing settings.
Site-wide
The demo becomes your design. Its Theme Options, fonts, colours, site title, front page and menu assignments are adopted, so a page you create three months from now still matches the design you chose today. Use this on a new website, or when you have decided to replace an old design outright.
Into an existing website
The demo pages arrive and the records they use come with them, while your Theme Options, site title, front page and current design are left exactly as they were. Use this when you want one landing page, a pricing section or a set of blocks to work from, and you are keeping your own design.
The scope changes settings, never your content. In both cases your existing pages and posts are untouched, and in both cases the import can be rolled back.
Step 5: What actually gets imported
Every demo is a complete website, so the import brings every part a website needs.
- Content. Every page from the live preview, blog posts with their categories and authors, portfolio items, events, products and any of the 42 demo content types the design uses.
- Media. Images sideloaded into your media library as ordinary attachments, not hotlinked from our servers, so they survive whatever we do next.
- Design records. Headers, footers, top bars, side panels, page title designs, heroes, sliders and popups. Each one arrives as a record you open and edit.
- Forms. A working form with its fields, notifications and submissions table in 75 of the 80 demos.
- Menus. Navigation menus built and assigned to the locations the design expects.
- Settings. On a site-wide import, the demo Theme Options, the front page, the blog page and the menu locations.
Store demos add products, categories, attributes and swatch colours. The importer adopts the WooCommerce pages your site has, so you finish with one shop, one cart, one checkout and one account page.
Step 6: Watch the stages go by
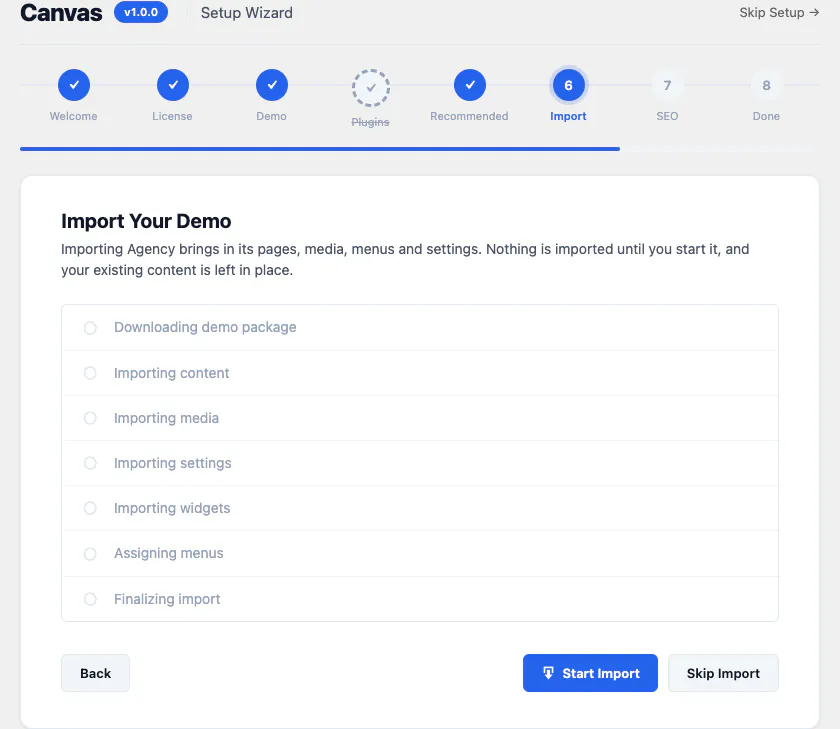
The import runs in named stages, and each one reports itself as it finishes. Nothing hides behind a progress bar.
- Check requirements, then install plugins if the demo needs any.
- Download demo, which fetches and extracts the package.
- Import content, then import media, which counts the images as it goes.
- Import settings, import widgets and import menus.
- Finalising, then a completion screen with links to visit the site or import another demo.
A stage that fails is reported on the spot, with retry and skip beside it, and the run goes on. If the whole thing is interrupted, by a browser tab closing or a hosting timeout, Canvas spots the unfinished import when you return and offers to carry on.
Step 7: What to change first
You now have a finished website with somebody else's words in it. Work in this order and it stops feeling like a demo within an hour.
- The site title and tagline. Settings, then General. These become the browser tab, the search result and the sharing card.
- The logo and the header. A header is a record built from blocks. Swap the logo, fix the menu, and set the button to the thing you want people to do.
- The home page, top to bottom. Every heading, paragraph, image and price is a block with a settings panel.
- The contact details. Footer, contact page and any form notification address. Send yourself a test message.
- The demo content you do not need. Delete the extra posts and pages outright, so nothing stale is left to surface later.
- The colours and fonts, if you have a brand. Theme Options carries 460 fields across 22 sections, and a site-wide import already filled them in for you.
Step 8: Undo an import: rollback and Delete Demo Data
Canvas records every post, term, attachment, menu and option an import touches, which is what makes both of these possible. They live in the Import History tab of the Demo Import screen, and they do different jobs.
Rollback
Rollback undoes one import. It removes the content that run created and restores the options that were in place immediately before it. Use it when you imported a demo, looked at it properly and decided against it, or when you imported the wrong one.
Delete Demo Data
Delete Demo Data removes everything a given demo ever created on this site. If you imported the same demo three times while experimenting, it rolls back all three records, newest first, so the options end up where they were before the very first import, and then sweeps up any stray content that carries the demo stamp.
Both show you what they are about to remove before you confirm, counted by type. An attachment shared with content outside the deletion set is kept and reported, so an image you reused on your own page does not vanish underneath it.
Content that was on the site before the import is never part of either operation. Each import is tracked separately, so removing one demo does not disturb another you imported last month.
Where to go from here
Two guides that use an import as their starting point, and the catalogue itself.
Common questions
The full FAQ answers the rest, and the documentation covers every setting in detail.
Will an import overwrite my existing pages?
No. An import only adds. Your pages, posts and products stay exactly where they are. A site-wide import does adopt the demo Theme Options, site title and front page, which is the whole point of choosing it, and a rollback puts back what was there before. Take a backup anyway, as you would for any change that touches content.
Why does demo import need a licence when the theme does not?
Because the demo packages live on our servers, so your key is checked before one is served. The theme and the plugin keep working without a key, and premium blocks show a notice that only administrators see. If a routine check cannot reach us, Canvas carries on as normal for 14 days.
Can I import only one page of a demo?
Choose the second scope, into your existing website, and you get the demo pages and the records they use without its settings, menus or front page. Then delete the pages you do not want. Or roll the whole import back and start again. Nothing about an import is permanent.
What happens to my WooCommerce pages?
They are adopted, not duplicated. The importer finds the shop, cart, checkout and account pages your site has and points the demo menus and links at them, so you do not wake up with two checkouts. Demo products, categories, attributes and swatch colours arrive alongside your own catalogue.
Build your next website with Canvas
Beginner, freelancer or agency, you get the same blocks, the same demos and the same support. Start with one site and add more when you need them.