

Start a WooCommerce store with WordPress
WooCommerce runs the shop: the products, the orders, the tax and the payments. What it does not do is make any of that look like your brand. This guide builds the four screens a shopper actually sees, using blocks in the editor WordPress already ships.
Step 1: Install WooCommerce
WooCommerce is a free plugin from the WordPress plugin directory, and it stays in charge of everything commercial: the product data, the stock, the orders, the tax rules, the shipping zones and the payment gateways. Canvas never replaces that layer, which is why your other WooCommerce extensions keep working.
Two ways to install it
- Let the setup wizard do it. Choose a store demo during setup and the plugins step installs and activates WooCommerce before the import runs, because a store needs a store plugin.
- Install it yourself from Plugins, Add New, and run the WooCommerce onboarding. Do this if you are adding a shop to a site you run today.
Either way, walk through the WooCommerce setup once and answer its questions about your country, your currency and what you sell. Those answers drive tax and shipping later, and they are tedious to unpick.
Set up an email delivery service before you take a real order. Order confirmations leave WordPress through your server by default, and a shop whose receipts land in spam creates support tickets you cannot answer.
Step 2: Start from a store demo, or from an empty catalogue
You have a choice here, and it is worth ten minutes of thought.
Import a store demo
19 of the 80 demos are working WooCommerce stores. Importing one gives you products, categories, attributes, swatch colours, a designed shop, a designed product page, a cart and a checkout, all in place and all editable. It is the fastest way to see how the pieces fit, and you can roll the whole import back if you decide against it.
Build on your own catalogue
If you already sell things and have products in the database, choose the page-only scope, into your existing website. You take the demo pages and the records they use without its settings, its menus or its front page, and your catalogue stays exactly where it is.
Either way, the WooCommerce pages on your site are adopted, so there is only ever one shop, one cart, one checkout and one account page.
Step 3: Add your first products
Products are WooCommerce records, added under Products in the WordPress admin, and this part is deliberately ordinary. Spend the time here rather than on the layout, because a good product page is mostly good product data.
- One clear photograph per product, shot the same way for every item. A catalogue grid looks designed when the shapes match, and thrown together when they do not.
- A short description that answers the question a shopper actually has. Size, material, how long it takes to arrive, what happens if it does not fit.
- Categories that match how people shop, not how your stockroom is organised.
- Attributes for anything variable. Colour, size, finish. Give the colour terms an actual colour value in the admin, because that is what turns a dropdown into swatches later.
- Stock, weight and dimensions if you ship physical goods. Shipping rules read them.
Add three products before you design anything. A layout judged against a single placeholder item is a layout you will rebuild.
Step 4: Design the shop page
The shop is a catalogue, and its job is to get somebody to a product page quickly. Canvas gives you blocks for it, where the usual answer is one theme setting with three layout choices.
The blocks
A products grid draws from a category, a tag, a search or a hand-picked list. A product carousel does the same in a row for a home page. Product category cards send people into a section. A price filter lets shoppers narrow a long catalogue. Each one is a block with a settings panel, so the number of columns, the source and the ordering are controls, not code.
The template underneath
The shop itself is a block template you can open in the Site Editor. Lay it out full width, with a left sidebar, a right sidebar or both, depending on whether filters and categories earn their place in your catalogue. There are 18 store templates in total, covering the shop, the product page, the archives, the cart and the checkout.
The store-wide defaults
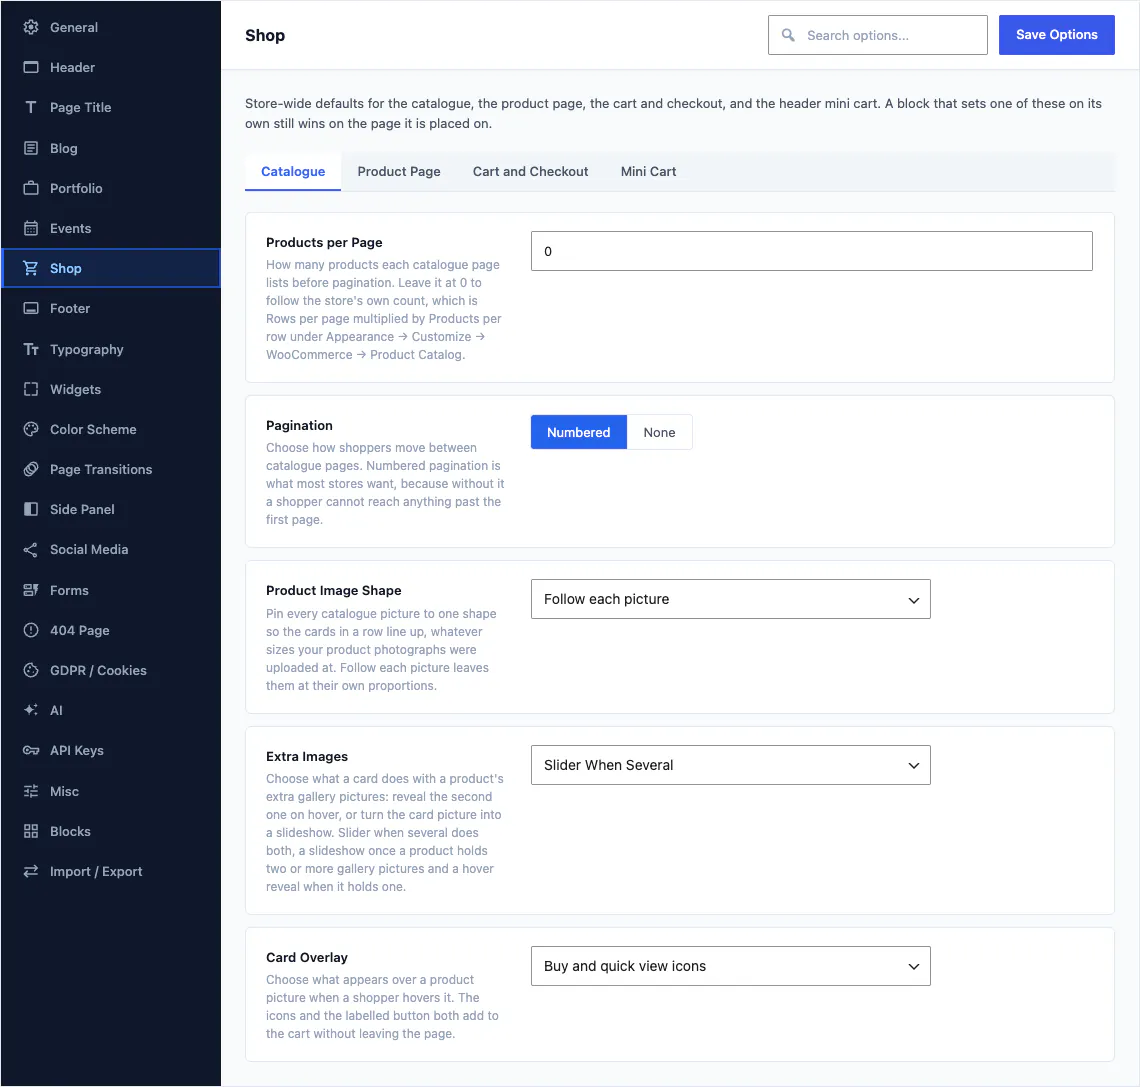
Theme Options carries 22 shop settings across four tabs: the catalogue, the product page, the cart and checkout, and the header mini cart. Products per page, pagination, the product image shape, whether extra gallery images reveal on hover and what the hover overlay offers all live there. A block that sets one of them on its own still wins on the page it sits on.
Step 5: Design the product page
This is the page that sells, so it deserves more than the default arrangement every store on the internet is using.
Build it from parts
Every piece of a product page is a block: the image gallery, the price, the star rating, the meta, the short description, the variation swatches, the add to cart button, the tabs, the share row and the related products. Move them, restyle them or leave one out entirely, and the page still works because each block asks WooCommerce for its own data.
Or start from a shipped layout
If you would rather not start from parts, pick one of the shipped single product layouts and move the pieces: the default, a sticky summary that follows the gallery as it scrolls, a list, a colour-led design, a store design, two gallery layouts with custom linking, and variants with a left, a right or two sidebars. Assign a layout per product from the editor, or set the store default in Theme Options.
What to put above the fold
The photograph, the name, the price, the variation choice and the add to cart button. Everything else, including the description most people never read, can sit below. Check that on a phone before you decide you disagree.
Step 6: The cart and the checkout
These two screens are where the money is lost, and in most themes they are the two screens you are not allowed to touch. Here they are blocks like everything else.
The cart
A cart table block for the contents, a cart totals block for the numbers, and a cross-sells block for the thing a shopper genuinely might add. Keep it short and keep the button obvious. The most common cart mistake is a wall of promotional content between the totals and the checkout button.
The checkout
A billing block for the form, an order review block for what is being bought, and a notices block for the messages that tell a shopper what has happened. WooCommerce still handles the order, the payment and the emails; you are deciding how the screen reads.
Rules that pay for themselves
- Ask for as few fields as your shipping actually requires.
- Show the total cost, including delivery, before the payment step.
- Say when the order will arrive, in days, in words.
- Put your returns policy where a nervous first-time buyer will see it.
Step 7: Swatches, add to cart and card styles
Three pieces of shop behaviour that usually cost a plugin each are part of the integration.
- Attribute colour swatches. Give a product attribute term a colour in the admin and variable products offer colour dots or button pills in place of a dropdown. A shopper then picks a variation by looking, which matters most on a phone.
- Add to cart without a page reload. Adding a product from a grid, a carousel or a card overlay updates the cart in place, so the shopper stays on the page they were browsing and the header cart keeps count.
- Product card styles. Pin every catalogue image to one shape so the grid lines up, choose whether extra gallery images reveal on hover or run as a slideshow, and decide what the hover overlay offers: buy, quick view or both.
All three are settings. None of them requires a snippet, a child theme or a second plugin, and each can be switched off if you prefer the plainer behaviour.
Some themes sell this layer on its own. OceanWP ships a free WooCommerce integration and offers Ocean eCommerce Pro as a separate product, and how Canvas compares with OceanWP sets out what each plan includes for a store.
Step 8: Payments, speed, then a test order
Design last, money first. Work through this before you tell anybody the shop is open.
The commercial setup, in WooCommerce
- Connect the payment gateways you intend to use and complete their verification, which usually takes longer than you expect.
- Set tax rules and shipping zones for the places you actually ship to.
- Write the refund, returns and delivery pages, and link them from the footer and the checkout.
Speed, in Canvas
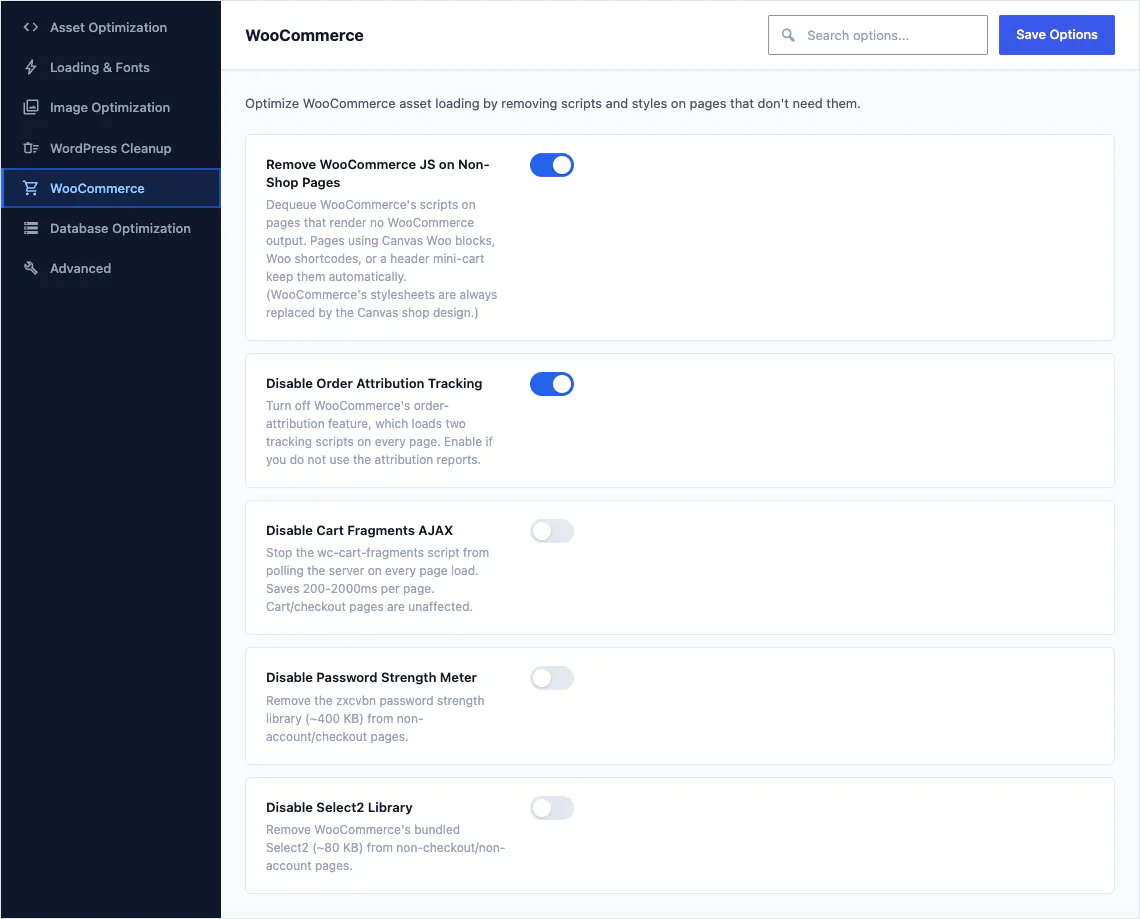
WooCommerce loads scripts and stylesheets on every page of a website, including the ones that sell nothing. Five switches take that back: remove WooCommerce JavaScript on pages that render no store output, turn off order attribution tracking, stop the cart fragments script polling on every load, and drop the password strength and select libraries outside the account and checkout pages. They sit among 35 optimisations, and every one is reversible.
Then place a real order
Buy something from your own shop, on a phone, on mobile data. Pay with a real card if your gateway supports a test refund. Check the confirmation email arrives, check the order appears in the admin, then refund yourself. Everything you find in those five minutes is something a customer would have found instead.
Where to go from here
Two guides for the rest of the site around the shop, and the store features in full.
Common questions
The full FAQ answers the rest, and the documentation covers every setting in detail.
Do I still need the WooCommerce plugin?
Yes. Canvas adds blocks, templates and options on top of WooCommerce and leaves the plugin in charge, so orders, products, taxes, shipping and payments stay where your other extensions expect to find them. If you start from a store demo, the setup wizard installs and activates WooCommerce before the import runs.
Are the store blocks an extra purchase?
No. All 22 store blocks are premium blocks and every plan includes every premium block, along with all 18 store templates and all 19 demo stores. There is no ecommerce tier and no store add-on.
Can I mix these with the WooCommerce blocks?
Yes. The Canvas store blocks are ordinary registered blocks, so they sit beside the WooCommerce blocks and core blocks in the same template and the same page. Replace one piece at a time and leave the rest of the layout alone.
Will importing a store demo give me two checkouts?
No. The importer finds the shop, cart, checkout and account pages your site has and points the demo menus and links at them, so you keep one of each. Your existing products and orders are left alone, and the whole import can be rolled back.
Build your next website with Canvas
Beginner, freelancer or agency, you get the same blocks, the same demos and the same support. Start with one site and add more when you need them.